

How to start use Kotlin Multiplatform for mobile development

1. Set up Kotlin Multiplatform Project
We are going to turn two standard projects (Android and iOS) into a multiplatform project with a shared library on Kotlin Multiplatform.
We will need:
- Android Studio 3.4.0+;
- Xcode 10.3+;
- Xcode Command Line Tools (
xcode-select --install); - CocoaPods (
sudo gem install cocoapods).
To start, we’ll need an Android project created from an Android Studio template and an iOS project created from an Xcode template. Put both projects in the same directory:
├── android-app
│   ├── build.gradle
│   ├── proguard-rules.pro
│   └── src
│       ├── androidTest
│       │   └── java
│       │       └── com
│       │           └── icerockdev
│       │               └── android_app
│       │                   └── ExampleInstrumentedTest.kt
│       ├── main
│       │   ├── AndroidManifest.xml
│       │   ├── java
│       │   │   └── com
│       │   │       └── icerockdev
│       │   │           └── android_app
│       │   │               └── MainActivity.kt
│       │   └── res
│       │       ├── drawable
│       │       │   └── ic_launcher_background.xml
│       │       ├── drawable-v24
│       │       │   └── ic_launcher_foreground.xml
│       │       ├── layout
│       │       │   └── activity_main.xml
│       │       ├── mipmap-anydpi-v26
│       │       │   ├── ic_launcher.xml
│       │       │   └── ic_launcher_round.xml
│       │       ├── mipmap-hdpi
│       │       │   ├── ic_launcher.png
│       │       │   └── ic_launcher_round.png
│       │       ├── mipmap-mdpi
│       │       │   ├── ic_launcher.png
│       │       │   └── ic_launcher_round.png
│       │       ├── mipmap-xhdpi
│       │       │   ├── ic_launcher.png
│       │       │   └── ic_launcher_round.png
│       │       ├── mipmap-xxhdpi
│       │       │   ├── ic_launcher.png
│       │       │   └── ic_launcher_round.png
│       │       ├── mipmap-xxxhdpi
│       │       │   ├── ic_launcher.png
│       │       │   └── ic_launcher_round.png
│       │       └── values
│       │           ├── colors.xml
│       │           ├── strings.xml
│       │           └── styles.xml
│       └── test
│           └── java
│               └── com
│                   └── icerockdev
│                       └── android_app
│                           └── ExampleUnitTest.kt
├── build.gradle
├── gradle
│   └── wrapper
│       ├── gradle-wrapper.jar
│       └── gradle-wrapper.properties
├── gradle.properties
├── gradlew
├── gradlew.bat
├── ios-app
│   ├── ios-app
│   │   ├── AppDelegate.swift
│   │   ├── Assets.xcassets
│   │   │   ├── AppIcon.appiconset
│   │   │   │   └── Contents.json
│   │   │   └── Contents.json
│   │   ├── Base.lproj
│   │   │   ├── LaunchScreen.storyboard
│   │   │   └── Main.storyboard
│   │   ├── Info.plist
│   │   └── ViewController.swift
│   └── ios-app.xcodeproj
│       ├── project.pbxproj
│       └── project.xcworkspace
│           └── contents.xcworkspacedata
└── settings.gradle
To do this, we create an Android project and rename the app module into android-app (remember to change the name of the module in settings.gradle too). Now, let’s create an iOS project ios-app in the root directory of the Android project.
Alternatively, download this archive with the ready setup.
2. Create a shared library module
To create a shared library we need to add a new gradle module (Android and mpp libraries are managed by build system gradle). To create the module:
Create an mpp-library directory (the name of our new gradle module) next to the apps to get:
├── android-app
├── ios-app
└── mpp-library
Create mpp-library/build.gradle. It will hold the multiplatform module configs. To begin with, the file will contain:
apply plugin: 'com.android.library'
apply plugin: 'org.jetbrains.kotlin.multiplatform'
Now let’s include the new module in settings.gradle:
include ':mpp-library'After applying these changes you can run Gradle Sync and make sure that the module has connected, but can’t be configured because the Android library is missing some data. First, we haven’t specified Android SDK versions. Let’s do this:
In mpp-library/build.gradle:
android {
    compileSdkVersion 28

    defaultConfig {
        minSdkVersion 21
        targetSdkVersion 28
    }
}This time Gradle Sync will show that it’s unable to read AndroidManifest. This file is essential for any Android module.
Let’s create mpp-library/src/main/AndroidManifest.xml with the following contents:
<?xml version="1.0" encoding="utf-8"?>
<manifest package="com.icerockdev.library" />Now Gradle Sync will run successfullу.
Setup mobile targets
Add the following to mpp-library/build.gradle:
kotlin {
    targets {
        android()
        iosArm64()
        iosX64()
    }
}Create these directories:
mpp-library/src/commonMain/kotlin/mpp-library/src/androidMain/kotlin/mpp-library/src/iosMain/kotlin/
Now we can run Gradle Sync and see that the directories commonMain/kotlin and androidMain/kotlin are highlighted as the source code directories unlike the iosMain/kotlin directory, but we’ll talk about it later. For now let’s make sure that everything Android-related is in androidMain.
Configure Android target
Move AndroidManifest.xml to androidMain:
mpp-library/src/main/AndroidManifest.xml → mpp-library/src/androidMain/AndroidManifest.xml
git changes
However, after this change you’ll notice that Gradle Sync is once again unable to read AndroidManifest. The reason is that the Android gradle plugin is not aware of the Kotlin Multiplatform plugin. To accurately move everything Android-related to androidMain, we need to add a special configuration.
Add to mpp-library/build.gradle:
android {
    //...

    sourceSets {
        main {
            setRoot('src/androidMain')
        }
        release {
            setRoot('src/androidMainRelease')
        }
        debug {
            setRoot('src/androidMainDebug')
        }
        test {
            setRoot('src/androidUnitTest')
        }
        testRelease {
            setRoot('src/androidUnitTestRelease')
        }
        testDebug {
            setRoot('src/androidUnitTestDebug')
        }
    }
}Now Gradle Sync runs successfully.
3. Write common code
We create mpp-library/src/commonMain/kotlin/HelloWorld.kt with the following contents:
object HelloWorld {
    fun print() {
        println("hello common world")
    }
}However, IDE will notify you that Kotlin has not been configured. That’s because we need to hook up the kotlin stdlib library to the common (aka shared) code.
In mpp-library/build.gradle:
kotlin {
    // ...

    sourceSets {
        commonMain {
            dependencies {
                implementation "org.jetbrains.kotlin:kotlin-stdlib:$kotlin_version"
            }
        }
    }
}Now IDE recognizes the Kotlin code, and we can write common code natively in Kotlin.
4. Android app realization
First, we need to hook up our shared library to android-app. We do it the same way as with any other Kotlin or Java module.
Add to android-app/build.gradle:
dependencies {
    // ...

    implementation project(":mpp-library")
}
Then call our print function on the main screen.
Add to android-app/src/main/java/com/icerockdev/android_app/MainActivity.kt:
class MainActivity : AppCompatActivity() {
    override fun onCreate(savedInstanceState: Bundle?) {
        // ...

        HelloWorld.print()
    }
}Then, on Gradle Sync IDE will notify you that the SDK version in android-app is lower than the SDK version in mpp-library - let’s upgrade it so that we can connect the shared library (otherwise, downgrade the SDK version in the shared library).
In android-app/build.gradle change the minimal version of the Android SDK to make it compatible with mpp-library:
android {
    // ...
    minSdkVersion 21
    // ...
}After these changes we can run android-app on the emulator and make sure that the logcat console displays a message.
Add Android-specific code
Suppose, we want to use a platform-specific API. To do this, we add the platform-specific code in the shared library.
Create mpp-library/src/androidMain/kotlin/AndroidHelloWorld.kt with the following contents:
import android.util.Log

object AndroidHelloWorld {
    fun print() {
        Log.v("MPP", "hello android world")
    }
}
This allows us to see another class (AndroidHelloWorld) in the Android version of the shared library, and we can use any platform functionality inside this platform-specific code (android.util.Log in our example). Now we just need to call this function in the app too.
Add in android-app/src/main/java/com/icerockdev/android_app/MainActivity.kt:
class MainActivity : AppCompatActivity() {
    override fun onCreate(savedInstanceState: Bundle?) {
        // ...

        AndroidHelloWorld.print()
    }
}After this change we can run android-app and check that the logging works through println and through Android’s Log.
5. iOS app realization
If you remember, IDE didn’t recognize iosMain/kotlin as a directory with the source code. That because we have initialized two targets - iosArm64Main и iosX64Main. The source code of these targets is expected in iosArm64Main/kotlin и iosX64Main/kotlin correspondingly. So we have to either duplicate the code or generalize it somehow. We recommend to use symlinks in iosMain. This approach will help us avoid the source code duplication and provide all-around correct integration with IDE.
Let’s create symlinks mpp-library/src/iosArm64Main and mpp-library/src/iosX64Main as follows:
cd mpp-library/src
ln -s iosMain iosArm64Main
ln -s iosMain iosX64MainNow we can run Gradle Sync and notice that iosX64Main/kotlin and iosArm64Main/kotlin have become the directories with the source code.
Let’s add the iOS-specific code for iOS, using the platform API. To do this, we can create a file in IDE through any of the created directries-symlinks (iosX64Main,iosArm64Main) - they link to the same place.
Create mpp-library/src/iosMain/kotlin/IosHelloWorld.kt:
import platform.Foundation.NSLog

object IosHelloWorld {
    fun print() {
        NSLog("hello ios world")
    }
}Now IDE correctly recognizes iOS platform APIs, has auto-import, autocomplete, and navigation to the definition.
We now can compile the framework that we will connect to the iOS app. But for framework compilation we need to complete project configuration first.
In mpp-library/build.gradle replace iosArm64() and iosX64() with a call to the configuration block:
kotlin {
    targets {
        // ...

        def configure = {
            binaries {
                framework("MultiPlatformLibrary")
            }
        }

        iosArm64("iosArm64", configure)
        iosX64("iosX64", configure)
    }
}After this change we can call Gradle Task``:mpp-library:linkMultiPlatformLibraryDebugFrameworkIosX64 to compile framework for the simulator. As a result, we will get our compiled framework in the directory build/bin/iosX64/MultiPlatformLibraryDebugFramework/. We now need to connect it to the iOS app.
Integrate framework into iOS app
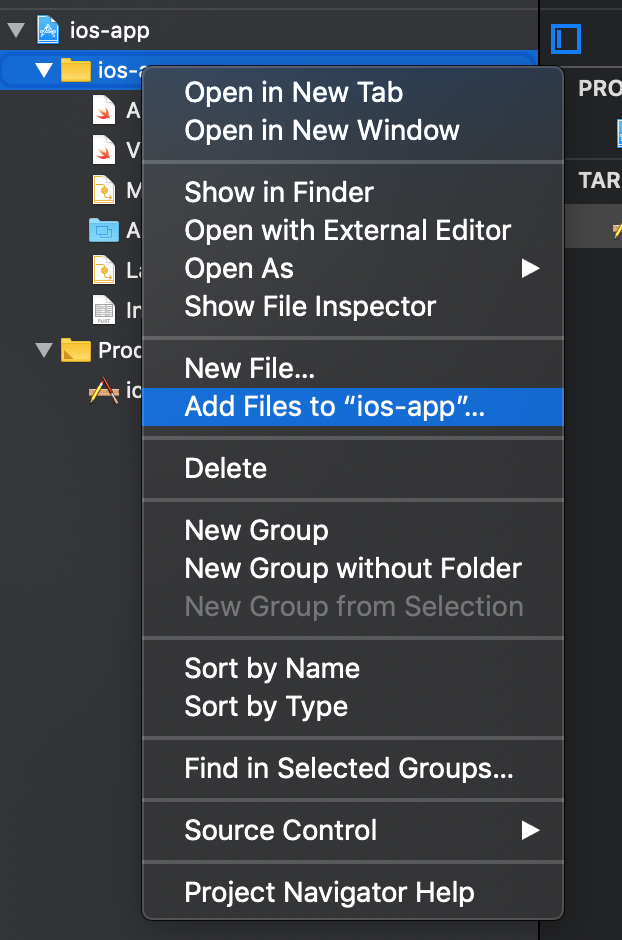
Open ios-app/ios-app.xcodeproj in Xcode and add framework to the project. To do this:
Add the framework to the project.
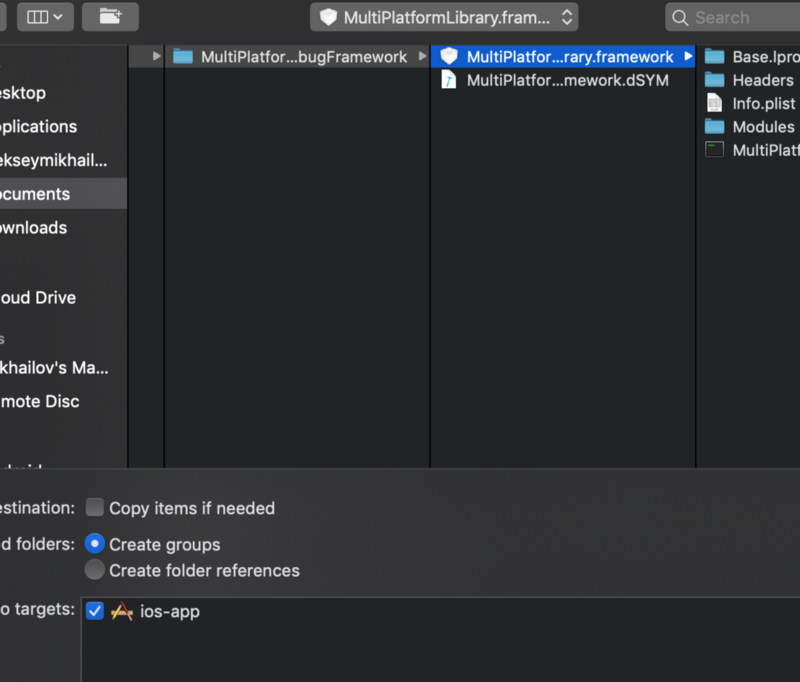
As a result, the framework should appear here:
Now we need to add the framework to embed frameworks.
Once that’s done, there will be duplicates in the linked frameworks. Delete one of them to get this:
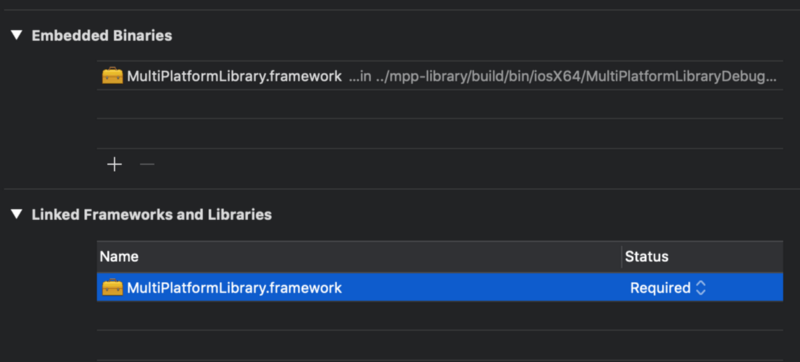
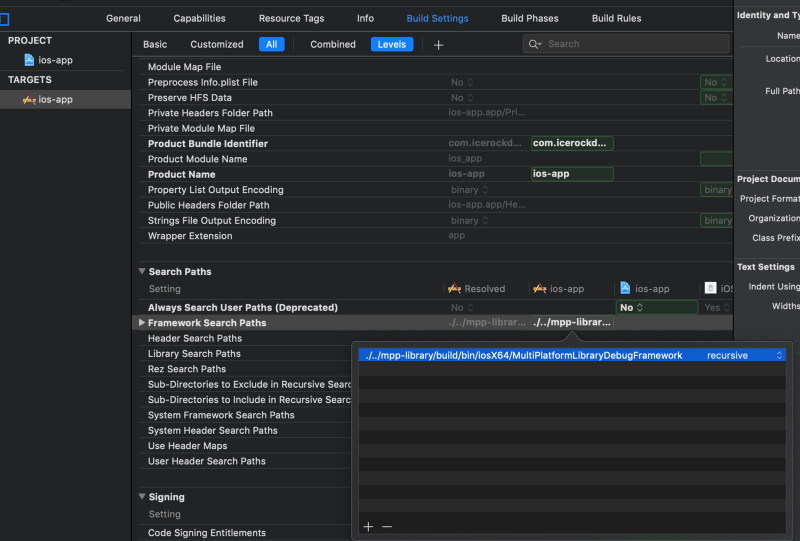
The last thing is to add the directory with the framework (./../mpp-library/build/bin/iosX64/MultiPlatformLibraryDebugFramework)to the search paths. We can do this in Build Settings of the target app.
Now we can update the view code by adding the following in ios-app/ios-app/ViewController.swift:
import UIKit
import MultiPlatformLibrary

class ViewController: UIViewController {
  override func viewDidLoad() {
    // ...

    HelloWorld().print()
    IosHelloWorld().print()
  }
}After this we can launch the iOS app in the simulator (not on device! We’ve compiled the framework for the simulator, and the settings are hard coded accordingly for now). After launching the app we see that both logging variants are working and that they look different, just as with Android.
6. Connect shared library via CocoaPods
We can use the dependency manager from CocoaPods to integrate the shared library into the app in the most simple and convenient (for iOS developers) way. The dependency manager will help us avoid configuring numerous project settings and a separate framework compilation through Android Studio.
Here’s how CocoaPods integration works. We create a local pod that contains an embed framework (already compiled from Kotlin), and the pod itself will participate only in one phase of compilation — via a script with the call to a gradle task to compile the framework.
CocoaPods dictates that the framework should always be in the same place. In our configuration it’s going to be in build/cocoapods/framework/MultiPlatformLibrary.framework.
Setup framework compilation into a single directory
Add in mpp-library/build.gradle:
At the beginning:
import org.jetbrains.kotlin.gradle.plugin.mpp.Framework
import org.jetbrains.kotlin.gradle.tasks.KotlinNativeLink
At the end:
tasks.toList().forEach { task ->
    if(!(task instanceof KotlinNativeLink)) return
    def framework = task.binary
    if(!(framework instanceof Framework)) return
    def linkTask = framework.linkTask

    def syncTaskName = linkTask.name.replaceFirst("link", "sync")
    def syncFramework = tasks.create(syncTaskName, Sync.class) {
        group = "cocoapods"

        from(framework.outputDirectory)
        into(file("build/cocoapods/framework"))
    }
    syncFramework.dependsOn(linkTask)
}
Setup local CocoaPod containing Framework
Create mpp-library/MultiPlatformLibrary.podspec:
Pod::Spec.new do |spec|
    spec.name                     = 'MultiPlatformLibrary'
    spec.version                  = '0.1.0'
    spec.homepage                 = 'Link to a Kotlin/Native module homepage'
    spec.source                   = { :git => "Not Published", :tag => "Cocoapods/#{spec.name}/#{spec.version}" }
    spec.authors                  = 'IceRock Development'
    spec.license                  = ''
    spec.summary                  = 'Shared code between iOS and Android'

    spec.vendored_frameworks      = "build/cocoapods/framework/#{spec.name}.framework"
    spec.libraries                = "c++"
    spec.module_name              = "#{spec.name}_umbrella"

    spec.pod_target_xcconfig = {
        'MPP_LIBRARY_NAME' => 'MultiPlatformLibrary',
        'GRADLE_TASK[sdk=iphonesimulator*][config=*ebug]' => 'syncMultiPlatformLibraryDebugFrameworkIosX64',
        'GRADLE_TASK[sdk=iphonesimulator*][config=*elease]' => 'syncMultiPlatformLibraryReleaseFrameworkIosX64',
        'GRADLE_TASK[sdk=iphoneos*][config=*ebug]' => 'syncMultiPlatformLibraryDebugFrameworkIosArm64',
        'GRADLE_TASK[sdk=iphoneos*][config=*elease]' => 'syncMultiPlatformLibraryReleaseFrameworkIosArm64'
    }

    spec.script_phases = [
        {
            :name => 'Compile Kotlin/Native',
            :execution_position => :before_compile,
            :shell_path => '/bin/sh',
            :script => <<-SCRIPT
MPP_PROJECT_ROOT="$SRCROOT/../../mpp-library"

"$MPP_PROJECT_ROOT/../gradlew" -p "$MPP_PROJECT_ROOT" "$GRADLE_TASK"
            SCRIPT
        }
    ]
end
Connect our local CocoaPod to the project
Create ios-app/Podfile:
# ignore all warnings from all pods
inhibit_all_warnings!

use_frameworks!
platform :ios, '11.0'

# workaround for https://github.com/CocoaPods/CocoaPods/issues/8073
# нужно чтобы кеш development pods корректно инвалидировался
install! 'cocoapods', :disable_input_output_paths => true

target 'ios-app' do
  # MultiPlatformLibrary
  # для корректной установки фреймворка нужно сначала скомпилировать котлин библиотеку
  pod 'MultiPlatformLibrary', :path => '../mpp-library'
end
Remove previously added FRAMEWORK_SEARCH_PATHS in the project settings. To do this, press backspace and remove the value altogether instead of editing the field by leaving it empty.

Call pod install in the directory ios-app (cocoapods need to be installed prior to this).
After successful pod install we get direct integration between Xcode and the framework (including automatic recompilation of the framework when recompiling the Xcode project). After installing the pods you should close the current Xcode project and open ios-app/ios-app.xcworkspace.
Now we can launch the iOS app on a device and see that it works correctly.
(!) It’s possible that when building through Xcode gradle won’t run successfully and notify you that java is missing. In this case you should install java development kit. When gradle runs through the Android Studio, it uses and openjdk variant from the Android Studio’s built-in distributive. So everything works out-of-the-box for the Android project.
That’s all. Thanks for being with us :) Join to our twitter https://twitter.com/KotlinMPP