

How to use Kotlin Multiplatform ViewModel in SwiftUI and Jetpack Compose
We at IceRock Development have been using the MVVM approach for many years, and the last 4 years our ViewModel are shared in the common code. We do it by using our library moko-mvvm. In the last year, we have been actively moving to using Jetpack Compose and SwiftUI to build UI in our projects. And it require MOKO MVVM improvements to make it more comfortable for developers on both platforms to work with this approach.
On April 30, 2022, new version of MOKO MVVM — 0.13.0 was released. This version has full support for Jetpack Compose and SwiftUI. Let's take an example of how you can use ViewModel from common code with these frameworks.
The example will be simple — an application with an authorization screen. Two input fields — login and password, button Log in and a message about a successful login after a second of waiting (while waiting, we turn the progress bar).
Create a project
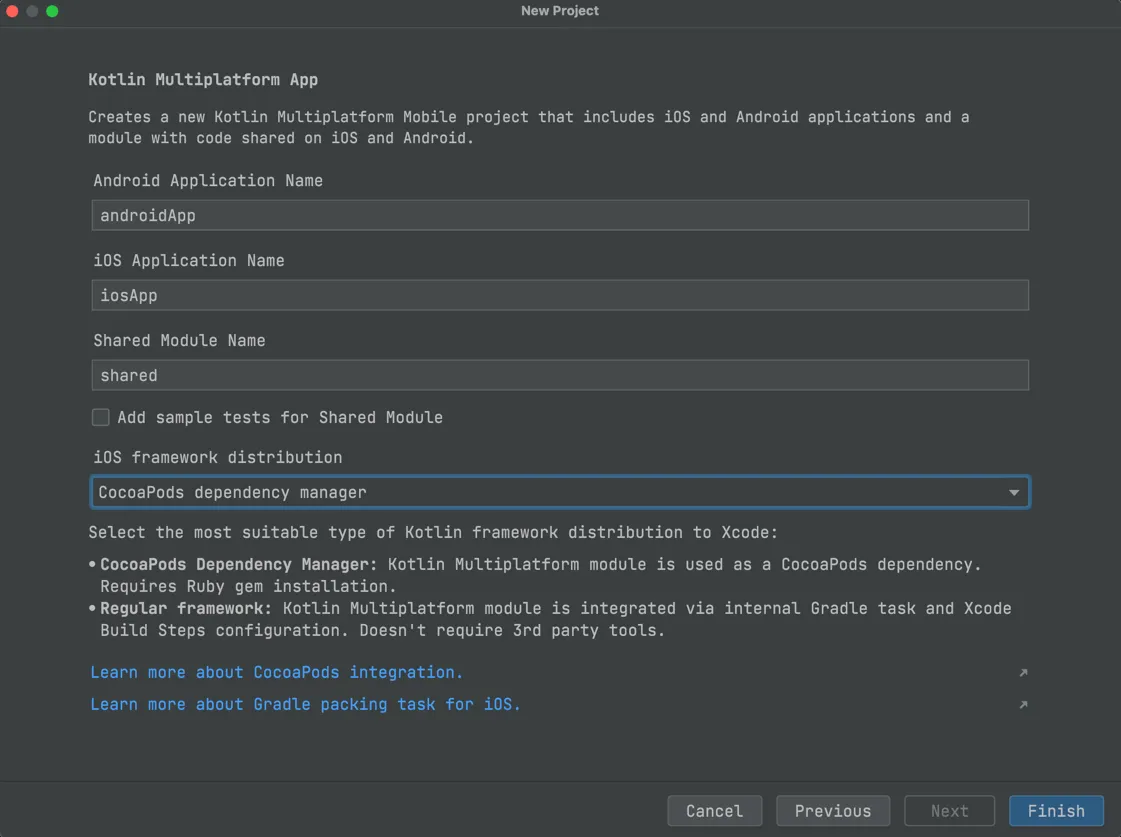
The first step is simple — take Android Studio, install Kotlin Multiplatform Mobile IDE plugin, if not already installed. Create a project according to the template "Kotlin Multiplatform App" using CocoaPods integration (it's more convenient with them, plus we need it to connect an additional CocoaPod later).
Login screen on Android with Jetpack Compose
The app template uses the standard Android View approach, so we need to enable Jetpack Compose before implementation of UI.
Enable Compose support in androidApp/build.gradle.kts:
val composeVersion = "1.1.1"
android {
   // ...
   buildFeatures {
       compose=true
   }
   composeOptions {
       kotlinCompilerExtensionVersion = composeVersion
   }
}
And we add the dependencies we need, removing the old unnecessary ones (related to the usual approach with view):
dependencies {
   implementation(project(":shared"))
   implementation(project(":shared"))
   implementation("androidx.compose.foundation:foundation:$composeVersion")
   implementation("androidx.compose.runtime:runtime:$composeVersion")
   // UI
   implementation("androidx.compose.ui:ui:$composeVersion")
   implementation("androidx.compose.ui:ui-tooling:$composeVersion")
   // material design
   implementation("androidx.compose.material:material:$composeVersion")
   implementation("androidx.compose.material:material-icons-core:$composeVersion")
   // Activity
   implementation("androidx.activity:activity-compose:1.4.0")
   implementation("androidx.appcompat:appcompat:1.4.1")
}
When running Gradle Sync, we get a message about the version incompatibility between Jetpack Compose and Kotlin. This is due to the fact that Compose uses a compiler plugin for Kotlin, and the compiler plugin APIs are not yet stabilized. Therefore, we need to install the version of Kotlin that supports the Compose version we are using is 1.6.10.
Next, it remains to implement the authorization screen, I immediately give the finished code:
@Composable
fun LoginScreen() {
fun LoginScreen() {
   val context: Context = LocalContext.current
   val coroutineScope: CoroutineScope = rememberCoroutineScope()
   var login: String by remember { mutableStateOf("") }
   var password: String by remember { mutableStateOf("") }
   var isLoading: Boolean by remember { mutableStateOf(false) }
   val isLoginButtonEnabled: Boolean = login.isNotBlank() && password.isNotBlank() && !isLoading
   Column(
       modifier = Modifier.padding(16.dp),
       horizontalAlignment = Alignment.CenterHorizontally
   ) {
       TextField(
           modifier = Modifier.fillMaxWidth(),
           value = login,
           enabled = !isLoading,
           label = { Text(text = "Login") },
           onValueChange = { login = it }
       )
       Spacer(modifier = Modifier.height(8.dp))
       TextField(
           modifier = Modifier.fillMaxWidth(),
           value = password,
           enabled = !isLoading,
           label = { Text(text = "Password") },
           visualTransformation = PasswordVisualTransformation(),
           onValueChange = { password = it }
       )
       Spacer(modifier = Modifier.height(8.dp))
       Button(
           modifier = Modifier
               .fillMaxWidth()
               .height(48.dp),
           enabled = isLoginButtonEnabled,
           onClick = {
               coroutineScope.launch {
                   isLoading = true
                   delay(1000)
                   isLoading = false
                   Toast.makeText(context, "login success!", Toast.LENGTH_SHORT).show()
               }
           }
       ) {
           if (isLoading) CircularProgressIndicator(modifier = Modifier.size
(24.dp))
           else Text(text = "login")
       }
   }
}
And here is our android app with authorization screen ready and functioning as required, but without common code.
Authorization screen in iOS with SwiftUI
Let's make the same screen in SwiftUI. The template has already created a SwiftUI app, so it's easy enough for us to write screen code. We get the following code:
struct LoginScreen: View {
   @State private var login: String = ""
   @State private var password: String = ""
   @State private var isLoading: Bool = false
   @State private var isSuccessfulAlertShowed: Bool = false

   private var isButtonEnabled: Bool {
       get {
           !isLoading && !login.isEmpty && !password.isEmpty
       }
   }

   var body: someView {
       Group {
           VStack(spacing: 8.0) {
               TextField("Login", text: $login)
                   .textFieldStyle(.roundedBorder)
                   .disabled(isLoading)

               SecureField("Password", text: $password)
                   .textFieldStyle(.roundedBorder)
                   .disabled(isLoading)

               Button(
                   action: {
                       isLoading = true
                       DispatchQueue.main.asyncAfter(deadline: .now() + 1) {
                           isLoading = false
                           isSuccessfulAlertShowed = true
                       }
                   }, label: {
                       if isLoading {
                           ProgressView()
                       } else {
                           Text("login")
                       }
                   }
               ).disabled(!isButtonEnabled)
           }.padding()
       }.alert(
           "Login successful",
           isPresented: $isSuccessfulAlertShowed
       ) {
           Button("Close", action: { isSuccessfulAlertShowed = false })
       }
   }
}
The logic of work is completely identical to the Android version and also does not use any common logic.
Implement a common ViewModel
All preparatory steps are completed. It's time to move the authorization screen logic out of the platforms in common code.
The first thing we will do for this is to connect the moko-mvvm dependency to the common module and add it to export list for iOS framework (so that in Swift we can see all public classes and methods of this libraries).
val mokoMvvmVersion = "0.13.0"
kotlin {
   // ...
   cocoapods {
       // ...

       framework {
           baseName = "MultiPlatformLibrary"
           export("dev.icerock.moko:mvvm-core:$mokoMvvmVersion")
           export("dev.icerock.moko:mvvm-flow:$mokoMvvmVersion")
       }
   }
   sourceSets {
       val commonMain by getting {
           dependencies {
               api("org.jetbrains.kotlinx:kotlinx-coroutines-core:1.6.1-native-mt")
               api("dev.icerock.moko:mvvm-core:$mokoMvvmVersion")
               api("dev.icerock.moko:mvvm-flow:$mokoMvvmVersion")
           }
       }
       // ...
       val androidMain by getting {
           dependencies {
               api("dev.icerock.moko:mvvm-flow-compose:$mokoMvvmVersion")
           }
       }
       // ...
   }
}
For input fields that can be changed by the user, we used MutableStateFlow from kotlinx-coroutines (but you can also use MutableLiveData from moko-mvvm-livedata). For properties that the UI should keep track of but should not change - use StateFlow. And to notify about the need to do something (show a success message or to go to another screen) we have created a Channel which is exposed on the UI as a Flow. All available actions we combine under a single sealed interface Action so that it is known exactly what actions can tell the given ViewModel.
Connect the common ViewModel to Android
On Android, to get our ViewModel from ViewModelStorage (so that when the screen rotates we received the same ViewModel) we need to include a special dependency in androidApp/build.gradle.kts:
dependencies {
   // ...
   implementation("androidx.lifecycle:lifecycle-viewmodel-compose:2.4.1")
}
Next, add LoginViewModel to our screen arguments:
@Composable
fun LoginScreen(
   viewModel: LoginViewModel = viewModel()
)
Let’s replace the local state of the screen with getting the state from the LoginViewModel:
val login: String by viewModel.login.collectAsState()
val password: String by viewModel.password.collectAsState()
val isLoading: Boolean by viewModel.isLoading.collectAsState()
val isLoginButtonEnabled: Boolean by viewModel.isButtonEnabled.collectAsState()
Subscribe to receive actions from the ViewModel using observeAsAction from moko-mvvm:
viewModel.actions.observeAsActions { action ->
   when (action) {
       LoginViewModel.Action.LoginSuccess ->
           Toast.makeText(context, "login success!", Toast.LENGTH_SHORT).show()
   }
}
Let’s change the input handler of TextFields from local state to writing to ViewModel:
TextField(
   // ...
   onValueChange = { viewModel.login.value = it }
)
And call the button click handler:
Button(
   // ...
   onClick = viewModel::onLoginPressed
) {
   // ...
}
We run the application and see that everything works exactly the same as it worked before the common code, but now all screen logic is controlled by a common ViewModel.
Connect the shared ViewModel to iOS
To connect LoginViewModel to SwiftUI, we need Swift add-ons from MOKO MVVM. They connect via CocoaPods:
pod 'mokoMvvmFlowSwiftUI', :podspec => 'https://raw.githubusercontent.com/icerockdev/moko-mvvm/release/0.13.0/mokoMvvmFlowSwiftUI.podspec'And also, in the LoginViewModel itself, you need to make changes - from the side of Swift MutableStateFlow, StateFlow, Flow will lose their generic type since they are interfaces. So that the generic is not lost you need to use classes. MOKO MVVM provides special CMutableStateFlow, CStateFlow and CFlow classes to store the generic type in iOS. We bring the types with the following change:
class LoginViewModel : ViewModel() {
   val login: CMutableStateFlow<String> = MutableStateFlow("").cMutableStateFlow()
   val password: CMutableStateFlow<String> = MutableStateFlow("").cMutableStateFlow()
   // ...
   val isLoading: CStateFlow<Boolean> = _isLoading.cStateFlow()
   val isButtonEnabled: CStateFlow<Boolean> =
       // ...
       .cStateFlow()

   // ...
   val actions: CFlow<Action> get() = _actions.receiveAsFlow().cFlow()
   // ...
}
Now we can move on to the Swift code. To integrate, we make the following change:
import MultiPlatformLibrary
import mokoMvvmFlowSwiftUI
import Combine
struct LoginScreen: View {
   @ObservedObject var viewModel: LoginViewModel = LoginViewModel()
   @State private var isSuccessfulAlertShowed: Bool = false

   // ...
}
We add viewModel to View as @ObservedObject, just like we do with Swift versions ViewModel, but in this case, due to the use of mokoMvvmFlowSwiftUI we can immediately pass Kotlin class LoginViewModel.
Next, change the binding of the fields:
TextField("Login", text: viewModel.binding(\.login))
    .textFieldStyle(.roundedBorder)
    .disabled(viewModel.state(\.isLoading))
mokoMvvmFlowSwiftUI provides special extension functions to ViewModel:
- binding returns a Binding structure, for the possibility of changing data from the UI side
- state returns a value that will be automatically updated when StateFlow returns new data
Similarly, we replace other places where the local state is used and subscribe to actions:
.onReceive(createPublisher(viewModel.actions)) { action in
   let actionKs = LoginViewModelActionKs(action)
   switch(actionKs) {
   case .loginSuccess:
       isSuccessfulAlertShowed = true
       break
   }
}
The createPublisher function is also provided from mokoMvvmFlowSwiftUI and allows you to transform CFlow in AnyPublisher from Combine. For reliable processing actions we use moko-kswift. This is a gradle plugin that automatically generates swift code based on Kotlin. In this case, Swift was generated enum LoginViewModelActionKs from sealed interface LoginViewModel.Action. Using automatically generated enum we get a guarantee that the cases in enum and sealed interface match, so now we can rely on exhaustive switch logic. You can read more about MOKO KSwift in the article.
As a result, we got a SwiftUI screen that is controlled from a common code using the MVVM approach.
Conclusion
In development with Kotlin Multiplatform Mobile, we consider it important to strive to provide a convenient toolkit for both platforms — both Android and iOS developers should comfortably develop and the use of any approach in the common code should not force the developers of one of the platforms to do extra work. By developing our MOKO libraries and tools, we strive to simplify the work of developers for both Android and iOS. SwiftUI and MOKO MVVM integration required a lot of experimentation, but the final result looks comfortable to use.
You can try the project created in this article yourself, on GitHub.
We can also help and development teams, who need development assistance or advice on the topic of Kotlin Multiplatform Mobile.